
UPDATE: We recently created a new wagon camper conversion back in Australia using lighter and stronger materials.
In 2015 we spent four months travelling around Chile and Bolivia in a custom converted Mitsubishi Montero Sport (aka Mitsubishi Challenger in Australia, Pajero Sport in Europe, Strada G-Wagon in Thailand and Shogun Sport in the UK) camperwagon.
The trip was a blast and we’re still slowly sorting through photos and gradually uploading the best and/or most interesting ones onto our Facebook and Instagram pages.
One huge learning experience from this trip was converting a significantly smaller vehicle than our Delica into a comfortable camper using only basic tools in a foreign country.
Like all good projects, we decided on a design based on many other camperwagon designs that people had built and used to travel with that would also meet our requirements of being relatively simple, durable and inexpensive to construct and use on a daily basis.
We were pleasantly surprised how functional, comfortable, durable and lightweight our camper conversion was. The best part is that this essential design can be modified to fit almost any vehicle with enough internal space to house the frame and still sleep on top.
Hopefully this information might help other people looking to convert their car into a camper for touring and travel. I have added notes, but they probably won’t make much sense until you actually start building it. The photos give you more of an idea of how it works and looks.
Time:
Allow for 12 hours of labour to design, construct, finish (including varnishing and sanding) and cleanup.
Project can be completed in one day with two people, a large area to work, materials on hand, and the correct tools.
Difficulty:
Easy. Basic power tools (see list below) and knowledge of how to use them are required.
Cost:
Around $300 to $350 (AUD), including the high density foam mattress (excluding tools you may need to purchase).
Tools:
- Drill driver (cordless with clutch ideal)
- Socket wrench set
- Jigsaw
- Circular saw
- Sander or sandpaper
- Locking pliers
Materials:
- 3x 9mm structural plywood sheets (usually 1200x1800mm)
- 1x 800mm length of 40x40mm square tubing or wood (for the legs)
- 14x heavy duty hinges (zinc plated or stainless steel)
- 16x corner brackets (zinc plated or stainless steel recommended)
- Countersunk, philips head screws (go for shorter 12 or 15mm ones when joining the ply)
- Wide paintbrush, marine varnish and thinner (for finish and protection)
- 1.2m of 20-30mm wide poly webbing (optional – for the rear fold out bench)
- 50-100mm thick high density foam mattress (depending on your weight and preference; 80mm was fine for us)
Method:
Clear out the back and measure your area. Take the opportunity to remove the carpet and give the whole area a good clean. We also recommend using strips of insulation material to fill out the gaps and provide a layer between the bare metal and the wooden base that will go on top.
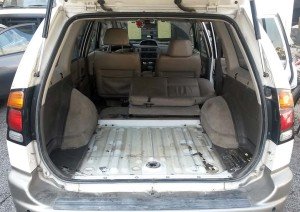
Cut a section of ply to be the base. Make the base as wide as possible within the wheel arches, and the length should be from the back of the passenger seat (folded up) to the door.
Hint: Ensure you mark and leave an access if you have a bolt for the spare wheel underneath
Measure how high you want the frame and then cut out the supports that will also separate your gear. The supports will be from the back door to the seat.
Hint: Make sure you don’t make the frame too tall. Don’t forget to factor in the thickness of the mattress you will be using. We recommend 80mm thick high density foam.
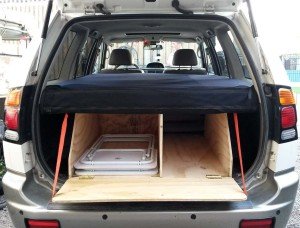
We used three sections, one against each wheel arch, and another in the middle (slightly offset) to separate our gear.

Measure up the top section of ply that will will be the mattress base. You can try to tweak the curves of the ply to match the internal shape of the car as closely as possible. Use a jigsaw to trip sections off that are in the way or will rub against the interior plastic or upholstery. The top section should be the full width of the interior and also the full length.
Hint: If the top section is too wide to fit inside the vehicle with the bottom section, you can cut off the “wings” on each side and attach with hinges. This will make the top section narrower when installing, and then fold out to full width once inside the car. Also, if your vehicle isn’t particularly long, some people find that they can still put in a top section up to 2m long that folds out to full length with the front seats rolled forward and tilted.
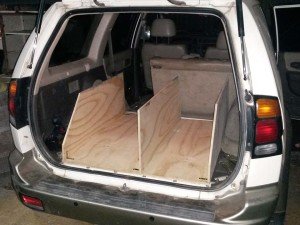
Use zinc coated or stainless steel corner brackets and shallow, countersunk screws to attach the middle supports to the base.
Make sure you measure and mark it up first, and also test that the rear seats can go upright (if you keep the seats) as the seats will be on an angle.
Put the base of the frame with the vertical supports attached in the back and check it fits nicely. Also see if there’s seat bolts or anchors which you can use to secure the bedframe.
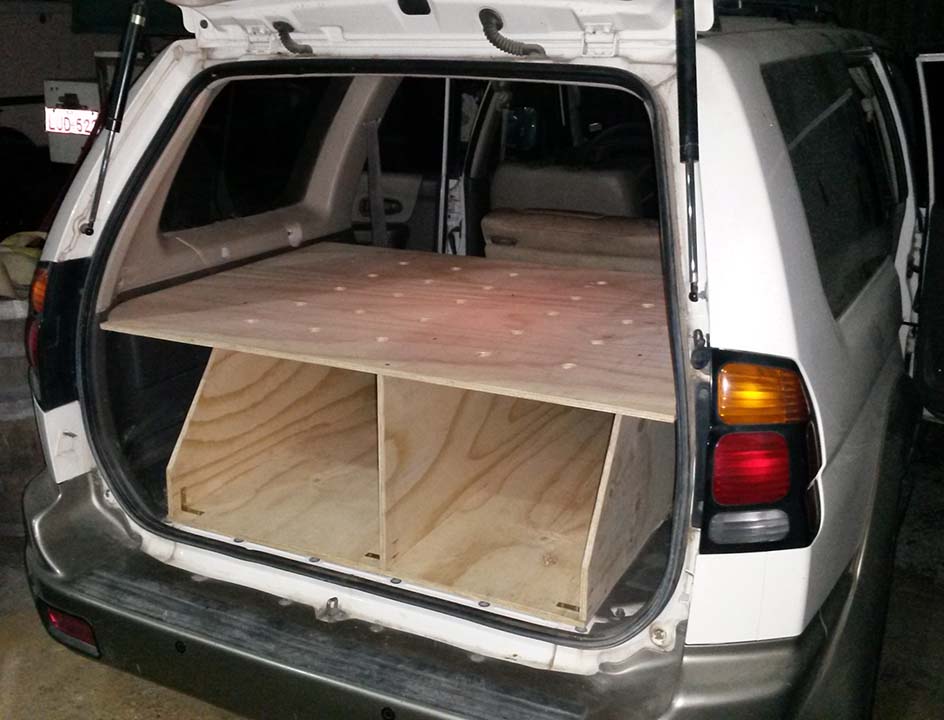
Put the top section in and check that everything fits. Trim and adjust as needed.
Remove the top section again. Mark where the rear seats will be and cut the top section. The idea is to split the top section into two or three pieces so it can fold back and allow access and use of the rear passenger seats and storage area when you’re not sleeping.
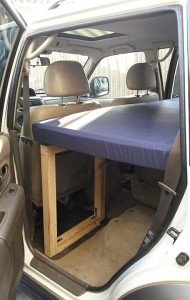
We also recommend to drill out a number of air holes approximately 30-50mm wide throughout the top section to help prevent moisture and condensation underneath the mattress while using it.

Cut the top section into the three or four lengths. The pieces depend on how long your vehicle is and if you need to move your front seats forward to get full sleeping length. In order to allow the sections over the passenger seats to be folded back, you will need to cut them on a ‘V’ angle that they clear the plastic and roof while folding back (see photo).

Once cut, put inside the vehicle, check that the sections all fit, and then attach the largest piece to the bottom section using screws and corner brackets. Then attach each section together and use hinges. In the photo you will notice that the front two sections are split. This is unnecessary and the sections will be stronger if they are one piece widthways.
Next we make legs to support the sections over the passenger footwells. We used a rigid ‘T’ style frame and legs that was also attached to the rear box. However this prevented the use of the 3rd seat in the back.
Instead, I’d recommend using aluminium or wooden square tubing, around 40x40mm, and attaching underneath the front section with hinges so that they can fold out and provide support as needed, but still allow the sections to be folded back, rather than having rigid front frame and legs as we did.

An optional extra is using any leftover materials to create a rear fold down table. We used the rear table many times a day. Make sure you use washers when attaching the straps to prevent tearing of the material. Also, it’s a good idea to use a self tapping ‘snap fastener’ to easily hold the tabletop in place when folded up. You could also use adhesive velcro.


Our Montero Sport was not a large vehicle as far as 4WD SUVs go. With a few tweaks you could also use this design with other 5-door, mid-sized wagons and SUVs. You just need enough length (with the front seats forward all the way) to fold the frame out to sleep on.
The design is also quite cost effective, as long as you know the right places to get good value, quality materials. The conversion cost us about $350 (AUD) all up, including the super comfortable high density foam mattress and a buying few tools. Considering a private room at a hostel costs around $50-70 a night in Chile, the initial outlay quickly paid for itself. Even in Australia most camp grounds charge around $20-40 a night for two people.
Since we’ve been back in Australia I’ve been eyeing off lots of potential stealth camperwagon options, including the Subaru Outback and Forester, to do another camper conversion for short trips in a smaller, more economical vehicle.
Lastly, we would like to extend a ‘muchas gracias’ to our amigos, Juan and Edu from Grizzly Camp Chile, who helped us out by providing a workshop, tools and assistance for the build. We could not have made it without their help. Plus they know how to make a mean Chilean-style BBQ!

If you are looking to buy a car and convert it to a camper in Santiago, Chile, then they are definitely worth getting in contact with!
Another option is to get in contact with the crew at Suzi Santiago who sell pre-converted vehicles to travellers. They also help out with doing the paperwork, registration and insurance. We’ve heard a lot of good reports about them, so give them a try and let us know your experience.
Hi,
My girlfriend and I are currently in Santiago and sourcing a 4WD for some adventuring around Sth America.
Great post along with your tips for the process of buying a car in Chile.
I can’t seem to find any contact details for GrizzlyCamp Chile? The website link you have isn’t working? Do you remember roughly their location or any other details I might be able to contact them?
Also, Do you have any suggestions as to where to buy the high density foam mattress?
Thanks very much for your tips!
Best regards,
Marty (fellow Aussie)
Hi Marty
Look up and add Juan Enrique Figueroa Escobar on Facebook and ask him for the address. Tell him Karl sent you. He and Edu can do the build for you and help you get the mattress etc for a small fee. He’s the owner of Grizzlycamp. Doesn’t speak much English though, so bring photos of what you need done.. He’ll sort your out. ?
Regards
Awesome. Thanks for the reply mate!
Best regards.
Awesome dudes! I gotta show my friend this article since he was planning to turn a cheap second wagon into a camper. Your article will definitely gives him some ideas!
Also ensure your friend has a look at our Corolla wagon conversion guide!
Good luck! 😀
The Montero Sport is already capable of making a long flat surface without doing all this by lifting the rear seat lower cushion (like reaching the jack) and then flipping the back of the rear seat
Yes for sure, but you lose the under-bed storage space then if you leave the seats, and it’s also less stable.
But for someone who wants a system just to use for one night every few weeks folding down the seat would be fine, and easy!
Cheers