The 12v electrical setup in the Delica campervan took a few weeks to research and finalise, but we are extremely happy with it. Like the bed frame, the electrical system was designed to be effective, simple, easy to assemble, modify and repair if needed. During the the research and design phase Karl sought advice from a number of online automotive forums and also contacted Derek from ABR Sidewinder prior to ordering the necessary equipment. Most connections were soldered where practical. Additionally all connections were crimped and heat-shrunk in order to reduce the chance of losing a connection or short circuits occurring.
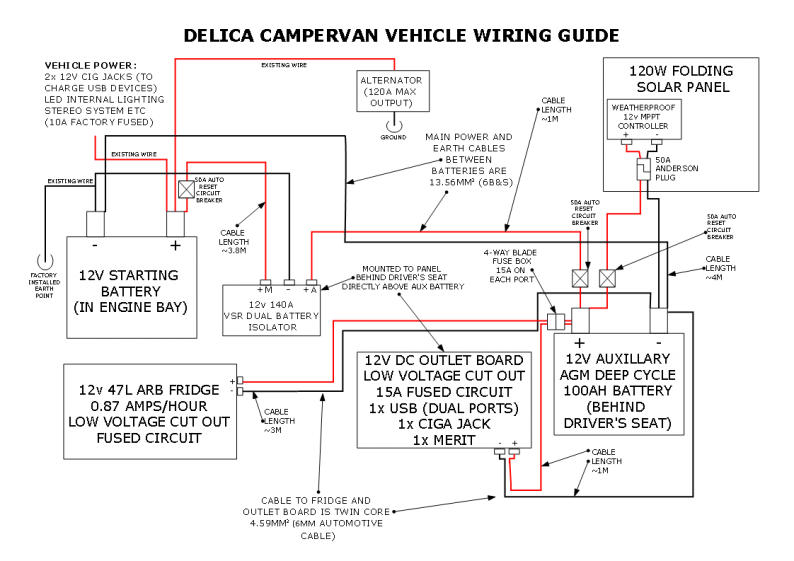
In order to make the design, assembly and modification of the 12v electrical system as simple and effective as possible, I decided to create a simple schematic diagram using the Google Layout program. The following schematic shows the core components of our system, as well as the approximate cable thicknesses and lengths, plugs/connections, and other accessories and paraphernalia required.
DISCLAIMER: Use the information provided in this article at your own risk. We are not responsible for any damages incurred to yourself or your property from following this information. This is a representation only of the 12v electrical system we installed in our own Delica camper. Ensure that you always disconnect the ground (black) cable when working with your electrical system. If you are not confident or knowledgeable enough to install and modify electrical system yourself then it is recommended to see your local auto electrician. Be sensible and be safe, always err on the side of caution.
Key considerations
If you are looking to install a 12v electrical system in your campervan as we have, there are some key points to keep in mind as you do your research:
- Safety first: Always disconnect the earth (negative / black cable) when doing any work on your system. Always use correctly rated fuses and/or circuit breakers on all cables to/from any devices and batteries.
- Work out your power consumption and generation requirements: We sought expert advice from our local battery store and ABR Sidewinder to determine what capacity battery and what output solar panel we would need. It was established that as we we were planning to constantly run our 12v ARB fridge, charge two smartphones each day, and charge our notebook PC and tablet for a few hours each week, that we would need an 80Ah deep cycle AGM battery as a minimum. Furthermore, we were recommended to use a 100Ah battery to allow for headroom. We were recommended to get the largest solar panel kit that we could afford and fit inside the vehicle, as a larger wattage solar panel kit will provide more power to charge to battery faster and compensate for low-light conditions where efficiency is reduced or reduced hours of sunlight during winter. We eventually settled on a 120w (2x 60w) portable folding solar panel kit, as it represented the best value at the time compared to larger systems, and was small enough to fit inside the storage cavity underneath the bed.
- Thicker is better when it comes to cables: Many home made 12v dual battery setups neglect using appropriate thickness cables, which represents a potential safety hazard and poor performance. Cable thickness is especially important when the cable is carrying high loads and over longer lengths. As shown in the diagram we were recommended to use 6B&S cable as a minimum for the cables running between the two batteries. Thicker cables are even better, but they are difficult and unwieldy to route and install, so keep that in mind before you go out and buy super-thick, oversize cables. We also used 10m of special 6mm2 thick, tinned solar grade cable to run to the solar panels to avoid voltage drop and other issues.
- Charging from the alternator is worth the effort and expense: Originally we were going to have an independent ‘house’ battery charged only from the soalr panels. This seemed like a good idea at the time, but we soon realised that it wasn’t the most robust and reliable plan as we would be spending many day driving and would be travelling in late autumn and winter, where cloudy days would be common. It cost a bit extra to buy the necessary cable, volt sensitive relay (VSR) / isolator and circuit breakers, but it as well worth the extra expense and time spent to research, design and install.
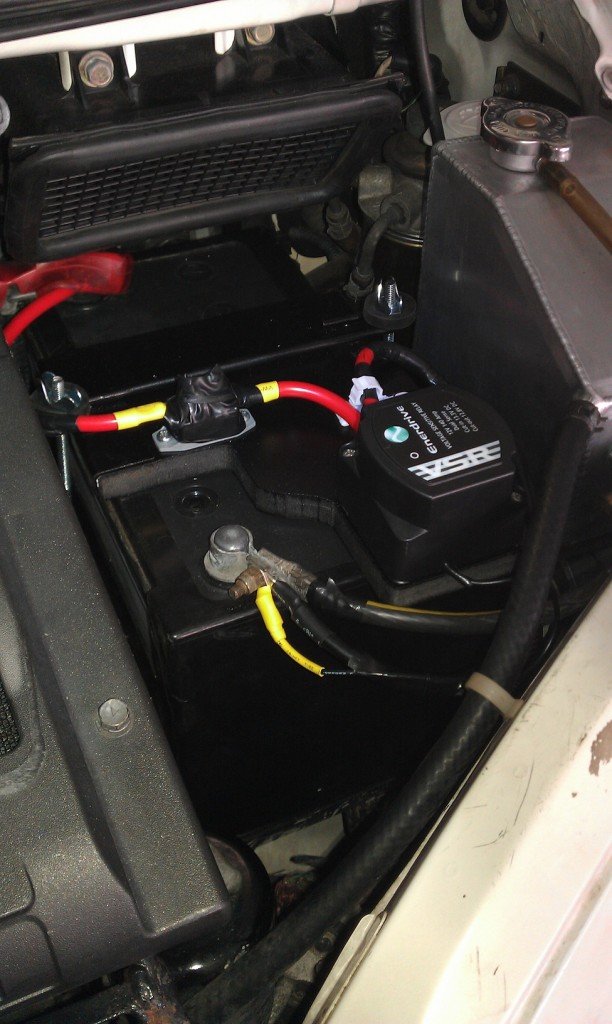
Primary battery and VSR in the engine bay. I had to make a mount for the VSR on top of the battery and position it in this way to avoid it fouling on the air intake assembly on the underside of the bonnet. Note that the power cable has been relocated so it no longer sits against the coolant expansion tank.
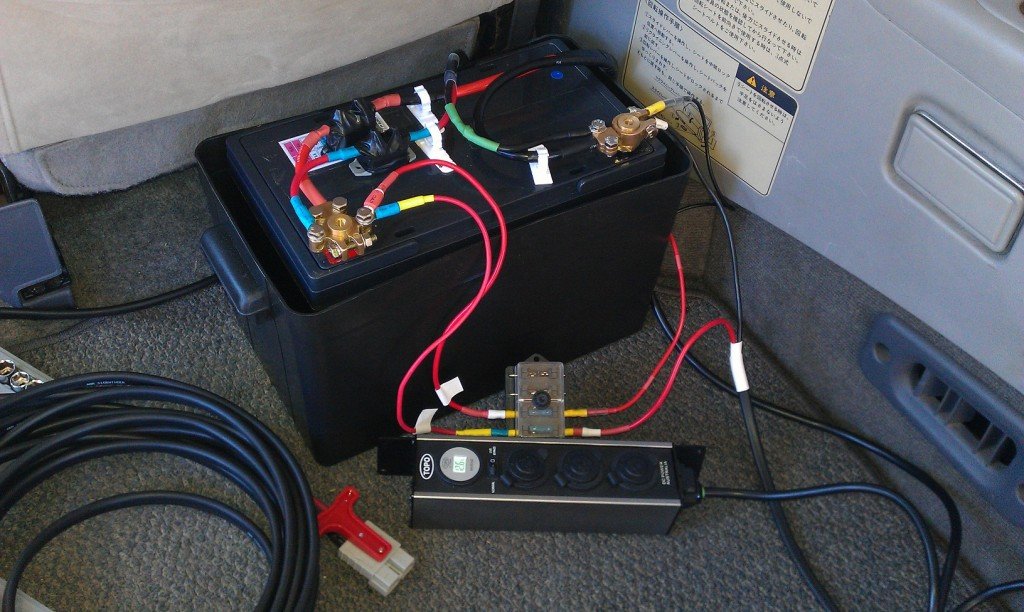
Test installation and power check. All internal components and battery are seen here, including the outlet board, 4-way fuse box, cable for the solar panel and the insulated auto-reset circuit breakers.
After a lot of trial and error, we found that the easiest way to route the thick power cables from the engine bay to the interior of the Delica was to run the cables through the engine bay, under the car along a chassis rail, and then through the existing grommet opening located underneath the passenger seat (remove the passenger seat for easy access). Ensure that you cover all the cable with weather resistant, protective split tubing, use heavy duty, outdoor-grade zip-ties, and also ensure that the grommet opening is sealed with silicon to prevent water coming through from underneath.
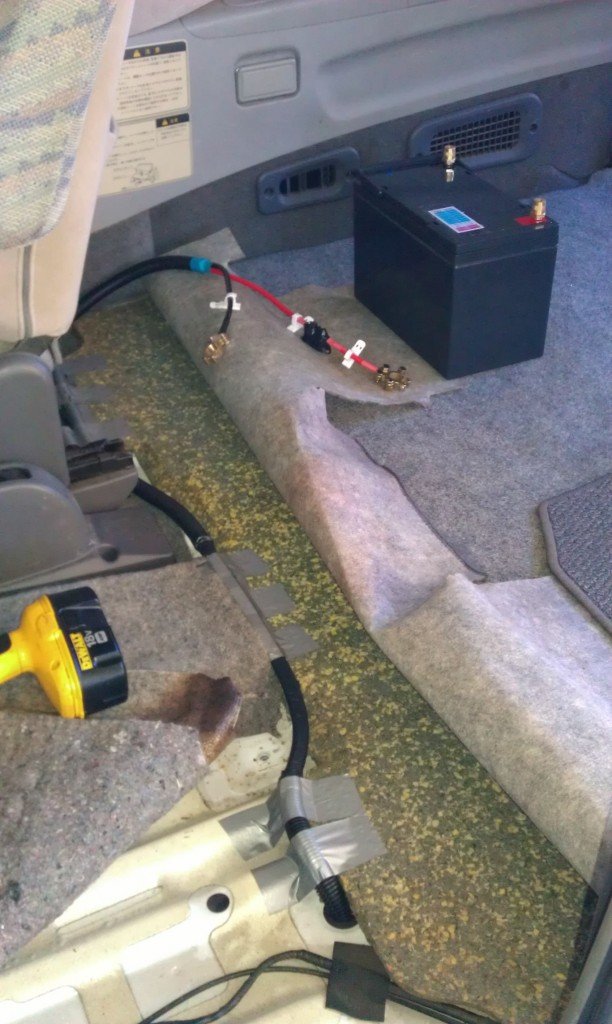
Battery and accessories fitted and installed. Shown is the protective plastic battery box (attached to the floor using seatbelt webbing), 4-way fuse box and 12v outlet board screwed to the side of the cabinet, and 10m cable in the storage pouch behind the driver’s seat.
If you have any questions please leave a comment below, or send an email to karl (at) comfortablylost.com.


Liking the set up. Very professional.
If you haven’t already put it in your 12v system you could place an inverter in after the AUX battery if you want to run any 240v accessories
Hi Scott
Originally we were going to get an expensive pure sine inverter to run our notebook PC. However we found it would be easier and more efficient to use a DC-DC adapter instead.
But we did end up buying a a simple 150W can-sized power inverter from Jaycar for around $40 (on sale), because we needed a source of mains AC power to occasionally charge camera batteries and Jahla’s epilator. The inverter is pretty good to use as it connects using a standard 12v ciga jack, has an inbuilt blade fuse and also a 2.1A USB connection too.
http://www.jaycar.com.au/productView.asp?ID=MI5127
Though in all honesty we have only needed to use it once during out trip, as we have a couple of camera batteries (and they last for ages!) and the other devices seem to stay charged for as long as needed between access to regular mains power. But since it was cheap and it is compact and lightweight we don’t mind having it on hand as a backup power source.
Thanks for stopping by mate
Karl & Jahla
Hi Karl,
do you have a picture of the cable route under Delica? I’m just making same project so I would like to double check with your experience.
Cheers Tom
Hi Tom
Sorry no photos of underneath. Essentially we went through the engine bay, under the chassis and then through the grommet that’s underneath the passenger’s seat.
What many other Delica owners seem to do is to run the cables through the driver’s side firewall hole (where most of the other cables are run through) and then under the carpet to the rear wherever the battery is stored. We didn’t do this because the firewall hole was full of cables and we couldn’t fit the two thick cables through, but months later I discovered that many of those wired were redundant (from a disconnected spotlight system) and I removed them which created more room to pass the cables through. So try using the existing firewall hole on the driver’s side first and see how you go! You’ll need around 5m+ of cable from the front battery to the back area.
All the best
Karl
Hi Tom
Sorry no photos of underneath. Essentially we went through the engine bay, under the chassis and then through the grommet that’s underneath the passenger’s seat.
What many other Delica owners seem to do is to run the cables through the driver’s side firewall hole (where most of the other cables are run through) and then under the carpet to the rear wherever the battery is stored. We didn’t do this because the firewall hole was full of cables and we couldn’t fit the two thick cables through, but months later I discovered that many of those wires were redundant (from a disconnected spotlight system) and I removed them which created more room to pass the cables through. So try using the existing firewall hole on the driver’s side first and see how you go! You’ll need around 5m+ of cable from the front battery to the back area.
All the best
Karl
Hey there, Ive got myself hooked up with a 3 battery system (2 starter 1 house)
Ive got a cable from the starters running to a battery at the back with an isolator to charge off the alternator, similar to yours.
Im thinking of adding another house battery to make it 2 and 2 and adding in a solar panel.
1. I wanted to know if you have any regulator from the solar panel to protect from over charging you house battery?
2,.Also do you manually disconnect your solar while driving to avoid tricking your isolator into thinking your house has enough voltage?
3. Have you found the panels to make a substantial difference to your system? In your opinion is it worth the money/ effort?
Hi Lucan
Sound good. Extra battery power is always good, provided you have the charging capacity to match it!
To answer your questions:
1. Yes. The solar panel kit came setup with a basic Maximum Power Point Tracker (MPPT) solar regulator / controller unit. This device is essential for any solar panels connected o a battery, as it monitors the battery and ensures that the battery does not get overcharged or exposed to damaging voltage levels. The newer MPPT units are especially effective at doing this job and often result in far more efficient charging than the older regulator/controller units.
2. No. Both our VSR and solar controller are ‘smart’ enough to manage the power levels and charging rate to the battery as needed. We leave the solar panels permanently connected. The panels turn off while the car is running, and kick in after the car turns off when the battery reaches a certain voltage. Driving the car provides most of the charging, and then the roof mounted solar panels provide a top-up float charge to both house, then starter battery, while parked. We’ve found this setup works very well and had far fewer low-power alarms after permanently mounting the panels on the roof.
3. Yes – as above. My advice would be to ensure you have more solar power output capacity than you calculate you’ll need, to make up for reduced efficiency situations such as overcast or hot weather, shady camp sites, short days in winter etc. Otherwise you’ll struggle to keep all those batteries full for long. We calculated that we’d need minimum 100w panels, so we went with 120w for extra. In hindsight I should have gotten a 140 or 160w kit as they’re only slightly larger and more expensive.
Another option, if you have the space, is a small Honda EU20i 4-stroke generator paired with a Projecta battery charger unit. We met a chap at a bush camp who helped charge our dying starter battery (5 years old, well overdue for replacement). He had a very compact generator that made barely any noise, was highly fuel-efficient and could provide a high level of power to rapidly charge his house batteries. He’d been using this system for about a year on the road, and only needed to run the generator for 1.5-2 hours a day to fully recharge his batteries; enough to run a 12v fridge, notebook PC, LCD TV and more in his caravan each day. It was quiet enough that we didn’t actually hear the generator he’d been using in the camp site 30m away until he brought it over to help us out! Worth considering.
All the best
Karl
[…] Additionally, the side panel provided a surface to mount our power output board and fuse box (see our other article to see our dual battery set-up in detail). The cabinet was secured to the bed frame using heavy duty self-drilling screws and to the floor […]
Hi Karl,
I have a 1998 Delica L400 that I just imported into Canada and want to setup a second battery. I also have been looking at products from ABR Sidewinder. But I notice that in your finally setup (as far as I can tell from the photos) you are not using the Sindwinder DBi-140 Isolator. What did Derek at ABR Sidewinder have to say? Which isolator did you finally end up installing? Do you know if the DBi-140 will work in the Delica? I have read some conflicting information regarding different battery isolators and their use with alternators that have either internal or external voltage regulators and I don’t know which kind the Delica has.
Thanks for your help!!
Scott
Hi Scott
Nice work!
We used the Enerdrive Dual Volt Sensing VSR in our setup, simply because it was cheap, compact, high quality and dual volt sensing which is a handy feature with dual batteries and dual power sources (alternator on one and solar on the other).
But the ABR Sidewinder unit will work fine. Derek knows his stuff, so just give him all the info about what you want to do and what you have at the moment, and he’ll suggest improvements based on that. Enjoy the design and build, and remember to disconect the earth when working on it! 🙂
Regards
Karl
[…] all sounds Greek to you (no offence to my Greek buddies), then I’d suggest you have a look at our other article about our 12v electrical system which has a diagram, photos and more information. This article also covers some of the basics and […]
Hello,
I am currently converting my 1991 Delica Exceed Starwagon into a camper, and I have a question about your dual battery system. Are you able to, or have you ever started your vehicle with just the auxillary battery? (in the event the starter battery dies). I would like this capability, but am wondering if the 50A circuit breakers would prevent the aux battery from providing enough power to start the van.
Thanks,
Jason
Hi Jason
Yes, we have jump started the Delica twice using the aux battery. All we had to do was manually bypass the VSR isolator and then it would start. No problems with the 50A circuit breakers tripping. Some VSR models actually have a convenient bypass switch/button on the unit or on the interior dash, so you just press the button to link the two batteries together and then start the vehicle. Very handy when you’re out in the wilderness with a flat starter battery!
Enjoy
Karl