In the past few years dreaming of our great adventure, we spent countless hours researching the various designs and configurations of campervans. We don’t profess that our setup and design is the best option out there and there’s a lot of things that we would have done differently or better if we had the time, money and capability. Our campervan conversion is the product of skills and resources, with the ultimate aim of being as functional, simple and practical as possible to construct, maintain and use on a daily basis.
The core components of the design was easy access to the fridge, cooking equipment, food, water and so on. We needed it to be easy to live in and from our campervan as we were planning to be doing this trip for at least 9 months, possibly longer. The setup also needed to be as robust and lightweight as possible. After all, it is going into a 4WD campervan where long bumpy roads are common, and the weight of the vehicle could mean the difference between constant bogs and easy driving.
The following photos show these core components of our Delica campervan, and how they were designed and constructed in chronological order. We hope these photos may help others looking to convert a Delica to a campervan. If you have any specific queries please leave a comment in the field below, or send an email to admin (at) comfortablylost.com.
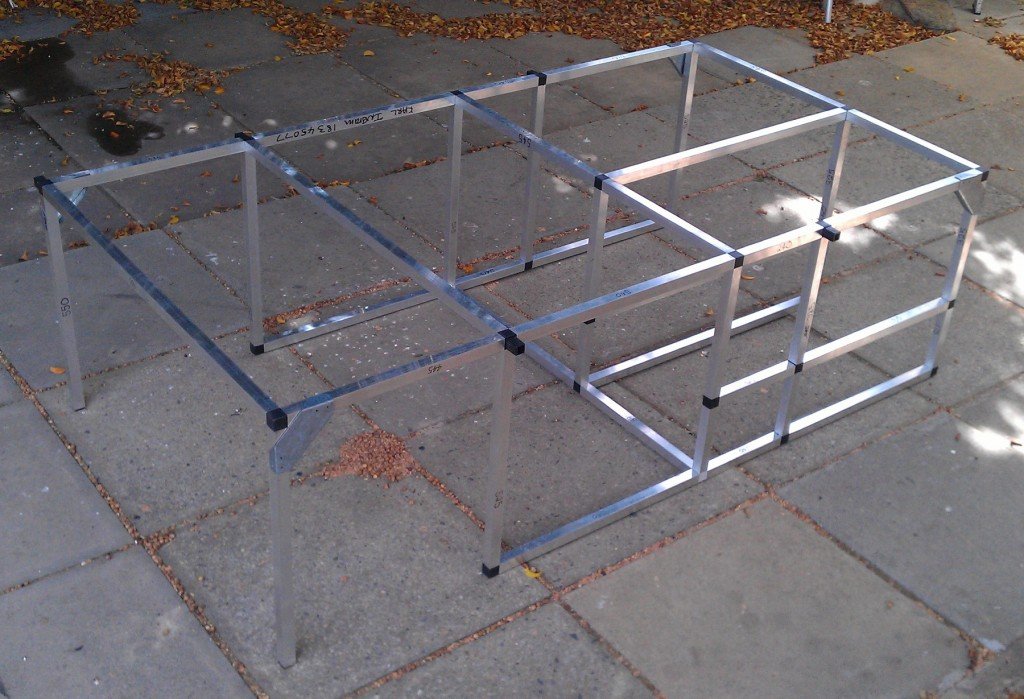
The main bedframe is made out of 25x25x1.6mm square aluminium as it is light, strong and easy to cut to size with a standard 32T hacksaw blade and jig. As aluminium is quite soft, it is also possible to cut the aluminium square tubing using a jig saw or a circular saw. Just ensure you use a sharp blade. A circular saw is good for cutting long sections down to size, but be very careful when using it to trim off small sections of the tubing as the piece can flick up and get caught in the blade! We used a 24T circular saw blade to make cuts on a later project, and then used a rough file to quickly remove the burrs and edges before fitting the plastic joiners.
We bought the aluminium from a large company specialising in steel supplies, rather than a regular hardware store where it was much more expensive. We then purchased plastic joiners as needed to suit the design from Ezimetal.
Hint: Google Sketchup is an excellent tool to create scale designs of your camper conversion. We found it excellent to work out exactly how much materials we required, and so avoided excess waste and expense.
Here is the aluminium frame fully assembled and ready to have the plywood cut to size and attached to it. We used plastic joiners instead of welding it, as this allows a strong build, whilst being easy to construct and modify in the future if required. The frame is very rigid, even without the corner bracings shown in the photo, especially with the plywood attached to it.
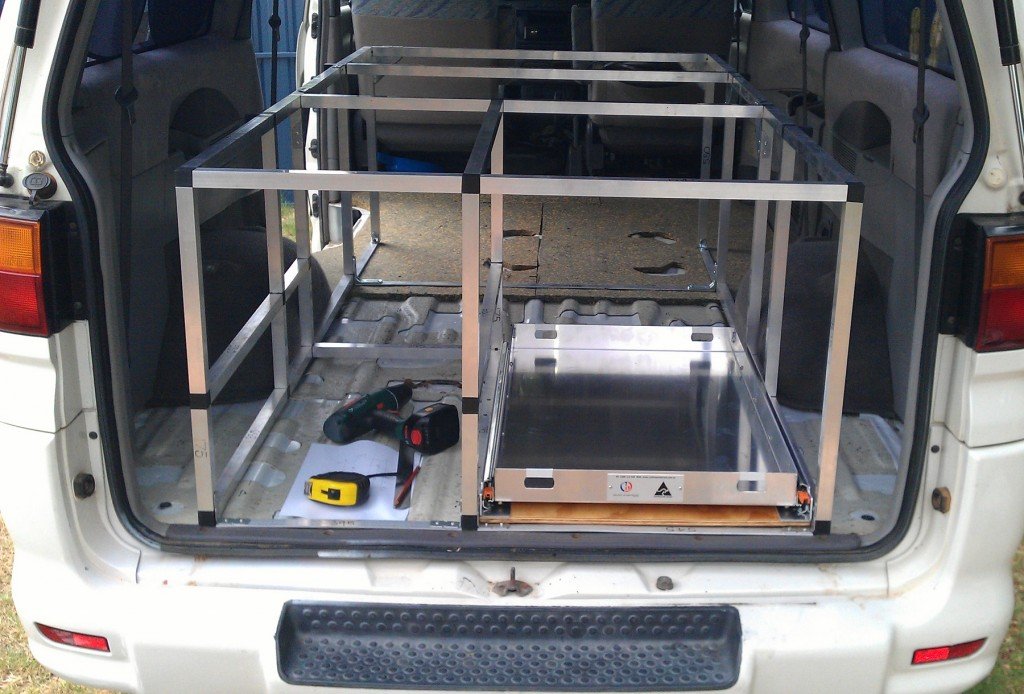
We bought a fridge slide unit to go into one of the rear cavities under the bed. The fridge slide, made by Dunn & Watson, is independently attached to the Delica’s floor via a 12mm section of structural ply. The bed frame and fridge slide was secured to the floor using a number of high tensile bolts, coupled with spring and flat washers to prevent it coming loose with vibrations over time. Existing floor holes were used where possible, however, a number of new holes were required to suit the frame design.
The frame was test-fitted a number of times before making permanent modifications such as drilling bolt mount holes in the floor. The floor insulation and vinyl flooring has not been installed in this photo, which is why the frame is slightly uneven at this stage.
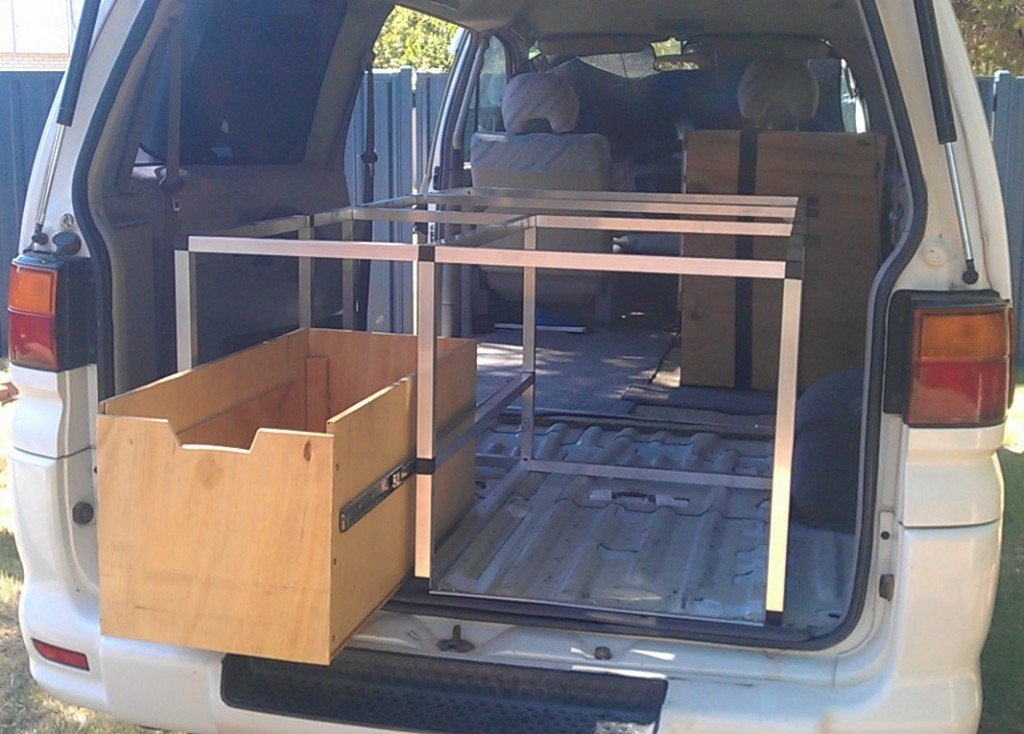
Using some old heavy duty, telescopic draw slides we found in the shed, a rear slider draw was constructed to hold our kitchen and cooking equipment. These heavy duty draw sliders are fairly cheap and available from most hardware stores. See our recommended companies section of the website for more information.
This was our first complete test fit with all the plywood cut and attached, floor insulation and vinyl flooring installed, and basic packing of the fridge and camp equipment. Everything fits while being secure and easy to access. The fridge slide and rear draw in particular was well worth the cost and effort to purchase and install, as we access these two areas multiple times a day.
In order to deal with the challenge of a moving cable due to the full extension fridge slide, we allowed an extra length of cable and attached the cable out of the way using adhesive-backed plastic cable management clips. We did have issues with the two clips closest to the fridge constantly falling off, due to the twisting motion when pulling the fridge out and pushing it back in, so we later purchased some larger, heavy duty cable clips which have solved the issue.
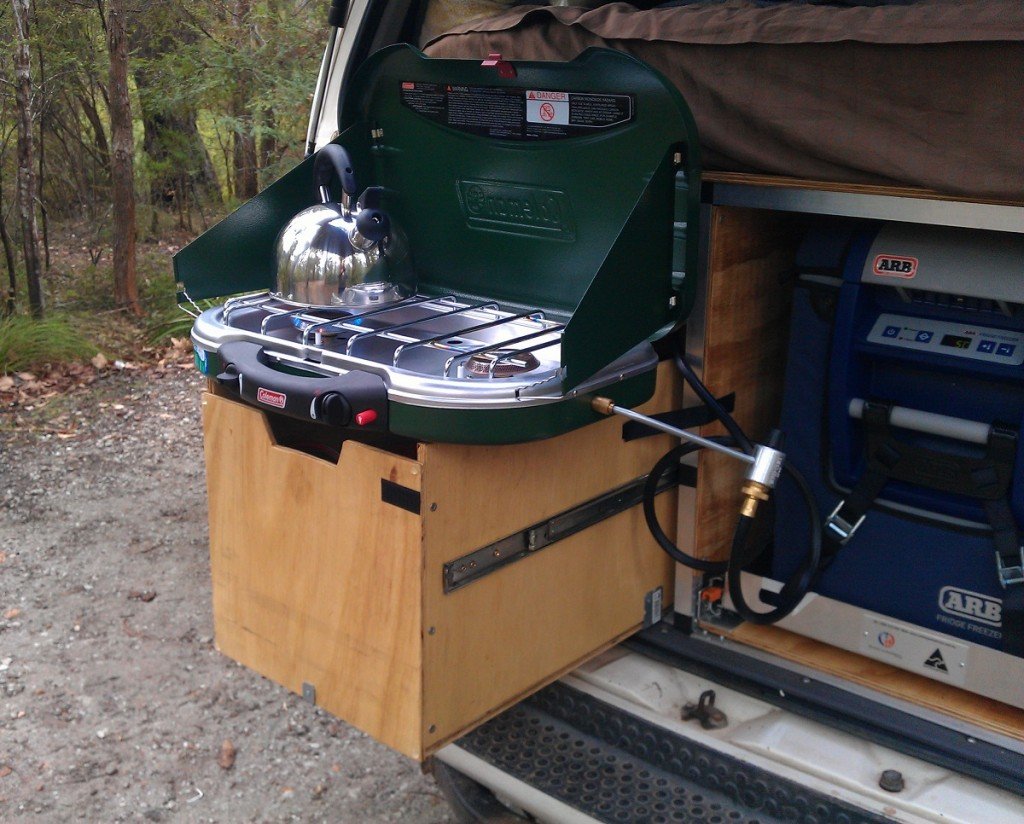
We attached some adhesive hook and loop (aka ‘Velcro’) to the front and sides of the draw to prevent it from coming open when the car is parked on an incline. An added bonus is that the gas stove comfortably sits on top of the draw, allowing us to cook basic meals and boil water from the back of the vehicle without having to unpack the camp table. Additionally the back door provides excellent shelter from light rain and/or the sun.
We made a food storage cabinet using leftover aluminium square tubing and plywood, and over-centre latches to secure the cabinet doors in place. The cabinet provided a location for our food that was protected from sunlight, excessive heat, rodents and ensured our food didn’t escape when we were offroading. Additionally, the side panel provided a surface to mount our power output board and fuse box (see our other article to see our dual battery set-up in detail). The cabinet was secured to the bed frame using heavy duty self-drilling screws and to the floor using high tensile bolts. This was done so the cabinet wouldn’t be move around and become a hazard in the event of a collision, roll-over or sudden stop .
Final thoughts
After almost four months living with our camper setup, we are generally very happy with our Delica campervan conversion. There were a few small niggles in terms of the design, some which could have been avoided, others that were impossible without major design changes. For anyone else looking to do a campervan conversion, in particular with a L400 Delica, keep the following points in mind:
Head space: Having a high frame is nice because it allows a significant amount of storage space underneath the bed, however this reduces the amount of space between the mattress and the roof. We originally thought to have enough space between the mattress and the roof to be able to sit up on the bed to read a book etc. However as the fridge was quite tall, the frame also had to be high enough to allow access. The result was that we are unable to sit upright in the bed, which means that the car is less liveable, especially during times of poor weather, as we have to climb in and out of bed. A pop-top installation would fix this issue, however the cost of such an upgrade to be constructed, fitted and certified is prohibitive. Most quotes for this upgrade were around $7000-8000 AUD installed.
Accessibility: Having the fridge accessible from the back door and on a heavy duty, full extension slider was well worth the expense and extra effort to install. The location of the fridge under the bed frame make it extend at waist height, and so very easy to access the contents. Same for the full extension storage draw and storage shelf next to the fridge.
Mould: We had an issue of mould growing under one section of the mattress after leaving a section of foam flooring between the ply base and the mattress. We eventually had to throw away the mattress cover and replace with a new one. We then removed the contaminated section of plywood and replaced it with pine 20x20x60mm timber slats instead, spaced approximately 100mm apart. Since doing this we haven’t had any further issues.
Ventilation and airflow: We found the hard way how important it is to have ventilation and airflow inside the van. On cold nights we had issues with interior condensation on all the windows which made it a pain each morning to wipe away and be able to see properly. On warm nights we found that the small interiour of the van got quite warm and stuffy. The main issue with a stock Delica is the pop-out passenger windows, as they are difficult to make insect proof, don’t open up much, and also will let rain in. In the end we made some aluminium mesh inserts for the front windows (which have rain guards) to allow a bit extra ventilation, and we also have a 12v fan to help move air around on really warm nights (although it does use a fair amount of battery power). Installing sliding side windows with bug-proof mesh covering is a good option to allow extra airflow. Additionally we saw many professionally designed campervans and motorhomes with roof-mounted vents or a 12v fan-assisted vent which have mesh to prevent insects and allow hot air to escape. These looked like a good idea and we’ll probably fit one ourselves in the near future.
Leaks and spills: Nothing is worse than having something leak or spill inside a campervan, as this causes issues with mould and odour. We found that putting all our liquid foods, sauces, jars etc inside rigid snaplock plastic containers was excellent to contain any possible leaks. We also spent time checking that all the seals around the Delica’s doors and windows were intact. Transparent silicon sealant is excellent to plug any gaps or spots were water leaks are present.
Flooring: Originally we were going to keep the carpet floor, but after pulling it up we found that it was contaminated with mould. We then decided to discard the carpet and replace all the floor insulation with yoga-mat style padding and use the original carpet as a template for a 1mm thick vinyl floor. We were glad to do this in the end as the solid, smooth floor makes sweeping out the interior much easier.
Frame material: We were very happy with the rigidity and light weight of the aluminium bed frame. The plastic connection joiners made assembly very simple and easy too.
Rear draw: We found that having a full extension draw at the rear made accessing our cooking equipment much easier, and we also enjoyed being able to use the draw as a makeshift table for the gas cooker. However, one major oversight was that the freebie draw slides we used do not have a locking mechanism to prevent them from sliding in/out when parked on a slope. We made a temporary fix for this issue using adhesive velcro attached to the frame and the draw (visible in the photo above). A better solution would be to use adjustable toggle/over-centre latch (like we did with the cabinet) or to use locking draw sliders from the start.
If you have any questions about our build or where to source materials or components, please leave a comment below or send an email to admin (at) comfortablylost.com.


